


Step-by-Step Guide to Create a Kubernetes Cluster on Linux VMs
Published on
by

This article will guide you how to create a Kubernetes Cluster on VM (Virtual Machines). This configuration is advantageous for establishing a physical Kubernetes cluster on your virtual machines. In this scenario, there will be one Master Node and one Worker Node on separate Ubuntu servers.
Step 1 – Set hostname on each Node
1. Login to Master Node server and set hostname using hostnamectl command
$ sudo hostnamectl set-hostname "k8smaster.example.net"
$ exec bash
2. On the Worker Nodes, run below commands
//This is for 1st Worker node
$ sudo hostnamectl set-hostname "k8sworker1.example.net"
//This is for 2nd Worker node
$ sudo hostnamectl set-hostname "k8sworker2.example.net"
$ exec bash
Step 2 – Map Hostnames to IP Addresses in /etc/hosts file
1. Get Private Ips of the server
$ sudo apt update -y
$ sudo apt install net-tools -y
$ ifconfig
Take private ip address from above command and proceed to next step
2. Open the file using below command
$ sudo nano /etc/hosts
3 – Add the below entries in opened file ( /etc/hosts) in last step
Example – <Server_private_IP_address> <hostname1>
192.168.1.xx k8smaster.example.net k8smaster
192.168.1.xx k8sworker1.example.net k8sworker1
192.168.1.xx k8sworker2.example.net k8sworker2
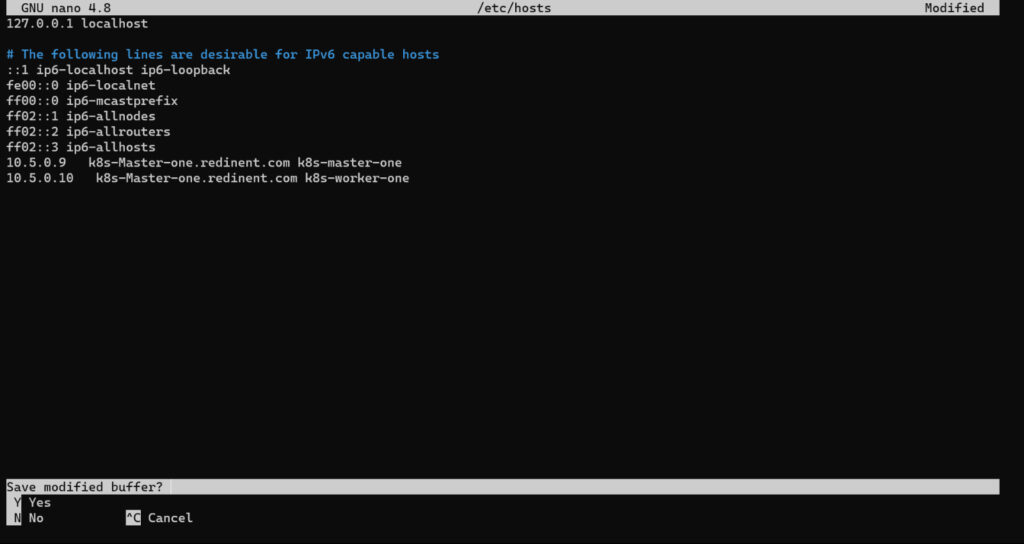
Save & Close the file (/etc/hosts).
Keep reading to learn more about our Kubernetes Consulting.
Step 3 – Installing Docker, Kubectl, And Kubeadm Packages
In order to install above packages, follow the steps mentioned below on Master as well as Worker Nodes
1. Disable swap & Add kernel Parameters
$ sudo swapoff -a
$ sudo sed -i '/ swap / s/^\(.*\)$/#\1/g' /etc/fstab
2. Configure persistent loading of kernel modules
$ sudo tee /etc/modules-load.d/containerd.conf <<EOF
overlay
br_netfilter
EOF
3. Load at runtime
$ sudo modprobe overlay
$ sudo modprobe br_netfilter
4. Update Iptables Settings
$ sudo tee /etc/sysctl.d/kubernetes.conf <<EOT
net.bridge.bridge-nf-call-ip6tables = 1
net.bridge.bridge-nf-call-iptables = 1
net.ipv4.ip_forward = 1
EOT
5. Reload the above changes with below command.
$ sudo sysctl --system
6. Installing docker
$ sudo apt install docker.io -y
$ sudo systemctl start docker
$ sudo systemctl enable docker
7. Add Apt Repository for Kubernetes
$ sudo apt-get update
$ sudo apt-get install -y apt-transport-https ca-certificates curl software-properties-common
$ curl -s https://packages.cloud.google.com/apt/doc/apt-key.gpg | sudo gpg --dearmour -o /etc/apt/trusted.gpg.d/kubernetes-xenial.gpg
$ sudo apt-add-repository "deb http://apt.kubernetes.io/ kubernetes-xenial main"
8. Install Kubectl, Kubeadm and Kubelet
$ sudo apt update
$ apt list -a kubeadm
$ sudo apt install -y kubeadm kubelet kubectl
$ sudo apt-mark hold kubelet kubeadm kubectl
Step 4 – Follow below steps on Master Node
1. Install Kubernetes Cluster on Ubuntu server
$ sudo kubeadm init
Note: After the initialization is complete, you will see a message with instructions on how to join Worker Nodes to the cluster. Make a note of the kubeadm join command for future reference.

If you forgot the token then use below command (follow below screenshot also) to create a new token.
$ kubeadm token create --print-join-command
![]()
2. To start interacting with cluster, run following commands on the Master Node,
$ mkdir -p $HOME/.kube
$ sudo cp -i /etc/kubernetes/admin.conf $HOME/.kube/config
$ sudo chown $(id -u):$(id -g) $HOME/.kube/config
3. Install Calico Network Plugin (A network plugin is required to enable communication between pods in the cluster)
$ kubectl apply -f https://raw.githubusercontent.com/projectcalico/calico/v3.26.0/manifests/calico.yaml
Step 5 – Follow below steps on Worker Nodes
Join Worker Nodes to the Cluster. On each Worker Node, use the kubeadm join command you noted down earlier after initializing the Master Node
$ sudo kubeadm join 10.5.0.7:6443 --token 2slaav.qpcu7ivjrvs4qe9a --discovery-token-ca-cert-hash sha256:16aa5830fc58f0b46c9327752972d0a015b62f56c3e62857b337d7f94274a319
Now K8 cluster will be installed. Also Master and Worker Node will be communicating with each other.
Step 6 – Verify the Node status (Execute below commands in Master Node only)
$ kubectl get nodes

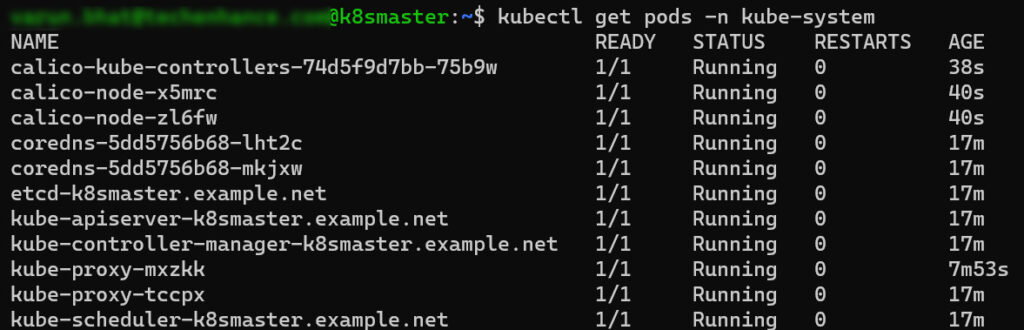
Step 7 – Verify the status of pods in kube-system namespace (Execute below commands in Master Node only),
$ kubectl get pods -n kube-system
You can get in touch with our DevOps Consultants at TechEnhance, and we will help you transition smoothly. If you need more help understanding Kubernetes, book a free call with us anytime!